အရင်ဆုံး ဒီ post ကိုမဖတ်ခင် #Understanding OpenLDAP post ကိုဖတ်သင့်ပါတယ်။ မဟုတ်ရင် အခု article ထဲမှာ ဘာပြောနေလဲ ဆိုတာ သိမှာ မဟုတ်ပါ။ configuration အတိုင်း လိုက်လုပ်လို့ ရသွားမှာပဲ ရှိပါလိမ့်မယ်။
ဒီ openldap လို့ဆိုလိုက်တာနဲ့ ကျွန်တော်တို့ စိတ်ထဲမှာ setup လုပ်ရတာ complex ဖြစ်တဲ့ Service တစ်ခုဆိုတာ သိထားမှာပါ။ အခု ဒီ article မှာ ဆန့်ကျင်ဖက် simple basic openldap ကို တည်ဆောက် ပြထားပါတယ်။ တည်ဆောက်ရမှာလဲ အကုန်လုံးကို terminal ကနေပဲ အလုပ်လုပ်သွားပြီး တစ်ခြား ဘာ အပို services (eg. phpldapadmin, migration tools) တွေမသုံးထားပဲ basic openldapကို အကြမ်းသဘောနားလည်သွားအောင် online ပေါ်ကနေရော စာအုပ်တွေထဲကနေ ရော အကုန်လုံးကို စုပြီး simple ဖြစ်တာလေးတွေကို မှတ်ပြီး ပြန်အသုံးပြုထားတာပါ။
#yum install openldap နှင့် လိုအပ်တာတွေကို install ပြုလုပ်သွားပါမယ်။

အောက်က ပုံမှာ openldap install လုပ်ပြီးနောက် စက်ထဲကို ရောက်လာတဲ့ location နှစ်ခု ကို ပြောထားတာဖြစ်ပါတယ်။ #/etc/openldap/slapd.d path လမ်းကြောင်းက openldap ရဲ့ configuration တွေရှိပြီး ထိုထဲမှာ "database" file တွေ "schema" file တွေရှိပါတယ်။ နောက်တစ်ခု #/etc/openldap/schema ထဲမှာကတော့ openldap အတွက် အသုံးလိုမယ့် schema တွေကို ထားပေးထားတာ ဖြစ်ပါတယ်။ ထိုထဲ မှ တစ်ချို့ကို အခု tutorial အတွက် import လုပ်သုံးမှာ ဖြစ်ပါတယ်။


အရင်ဆုံးဘာမှမလုပ်ခင် openldap ရဲ့ default root account နဲ့ domain name ကို ပြောင်းပါမယ်။ အောက်ပုံမှာ ပြထားပါတယ်။
 အောက်ပုံမှာ config file ထဲက "olcSuffix" နဲ့ "olcRootDN" ကို custom root name "sysadmin" နှင့် ldap name "example.com" ပြောင်းထားတာဖြစ်ပါတယ်။ အောက်ဆုံးမှာရှိတဲ့ "olcRootPW" မှာက root account ရဲ့ password ကိုသတ်မှတ်ထားတာ ဖြစ်ပါတယ်။

"olcRootPW" အတွက် terminal မှာ "slappasswd" command ကို အသုံးပြုပြီး ရလာတဲ့ password ကို "olcRootPW" မှာ သတ်မှတ်ထားတာဖြစ်ပါတယ်။


"/etc/openldap/slapd.d/cn=config/cn=schema" ထဲ မှာ import လုပ်လိုက်တဲ့ schema တွေ ရောက်သွားပြီဖြစ်ပါတယ်။

#Create Directory folder called /root/openldap/toplevel ထဲမှာ base.ldif ဖိုင်ကို တည်ဆောက်မှာ ဖြစ်ပါတယ်။ဖြစ်ပါတယ်။


#ldapadd command နဲ့ပဲ new entry "mgmg.ldif" ကို ldap ထဲသို့ import လုပ်ပါမယ်။ object class, attributes တွေ ထည့်ပေးထားတာ မှန်တယ်ဆိုရင်တော့ ဘာ error မှ မတက်ပဲ အဆင်ပြေပါလိမ့်မယ်။


#ldapsearch command ဖြင့် import လုပ်တာ ရောက်မရောက် စစ်ကြည့်နိုင်ပါတယ်။

"/etc/openldap/slapd.d/cn=config/cn=schema" ထဲမှ cn={3}nis.ldif schema မှ objectclass နဲ့ attributes တွေကို useradd တဲ့နေရာမှာယူသုံးသွားတာ ဖြစ်ပါတယ်။


အခု ဒီမှာတော့ Marketing ထဲမှာ ရှိတဲ့ user "mgmg" ကို marketing group ထဲကို member လုပ်မှာဖြစ်ပါတယ်။ "memberof.ldif" ဖိုင်တစ်ခု ဆောက်ပြီ: ထည့်မှာဖြစ်ပါတယ်။


နောက်ဆုံး အနေနဲ့ #ldapsearch -x -D "cn=sysadmin,dc=example,dc=com" -w anaconda -b "dc=example,dc=com" ဖြင့် ကြည့်လျှင် ကျွန်တော်တို့ တည်ဆောက်ခဲ့တဲ့ ldap base structure တစ်ခုလုံးကို ပြန်ကြည့်နိုင်ပါတယ်။
Deleting Entries from LDAP Directory
Entry ကို ဖျက်မယ်ဆိုရင်တော့ #ldapdelete command ကို အသုံးပြုပါတယ်။ ဥပမာ "mgmg" ဖျက်မယ်ဆိုရင် #ldapdelete -x -D "cn=sysadmin,dc=example,dc=com" -w anaconda "uid=mgmg,ou=users,dc=example,dc=com" ဆိုပြီ: ဖျက်နိုင်ပါတယ်။

ဒီ openldap လို့ဆိုလိုက်တာနဲ့ ကျွန်တော်တို့ စိတ်ထဲမှာ setup လုပ်ရတာ complex ဖြစ်တဲ့ Service တစ်ခုဆိုတာ သိထားမှာပါ။ အခု ဒီ article မှာ ဆန့်ကျင်ဖက် simple basic openldap ကို တည်ဆောက် ပြထားပါတယ်။ တည်ဆောက်ရမှာလဲ အကုန်လုံးကို terminal ကနေပဲ အလုပ်လုပ်သွားပြီး တစ်ခြား ဘာ အပို services (eg. phpldapadmin, migration tools) တွေမသုံးထားပဲ basic openldapကို အကြမ်းသဘောနားလည်သွားအောင် online ပေါ်ကနေရော စာအုပ်တွေထဲကနေ ရော အကုန်လုံးကို စုပြီး simple ဖြစ်တာလေးတွေကို မှတ်ပြီး ပြန်အသုံးပြုထားတာပါ။
Installing necessary packages for openldap
#yum install openldap နှင့် လိုအပ်တာတွေကို install ပြုလုပ်သွားပါမယ်။
အောက်က ပုံမှာ openldap install လုပ်ပြီးနောက် စက်ထဲကို ရောက်လာတဲ့ location နှစ်ခု ကို ပြောထားတာဖြစ်ပါတယ်။ #/etc/openldap/slapd.d path လမ်းကြောင်းက openldap ရဲ့ configuration တွေရှိပြီး ထိုထဲမှာ "database" file တွေ "schema" file တွေရှိပါတယ်။ နောက်တစ်ခု #/etc/openldap/schema ထဲမှာကတော့ openldap အတွက် အသုံးလိုမယ့် schema တွေကို ထားပေးထားတာ ဖြစ်ပါတယ်။ ထိုထဲ မှ တစ်ချို့ကို အခု tutorial အတွက် import လုပ်သုံးမှာ ဖြစ်ပါတယ်။
#/etc/openldap/slapd.d/cn=config/cn=schema path လမ်းကြောင်းထဲကို ၀င်ကြည့်လျှင် လောလောဆယ် "core.schema" ဆိုတဲ့ schema file တစ်ခုပဲတွေ့ရမှာ ဖြစ်ပါတယ်။
Changing the default domain name and Root account
အရင်ဆုံးဘာမှမလုပ်ခင် openldap ရဲ့ default root account နဲ့ domain name ကို ပြောင်းပါမယ်။ အောက်ပုံမှာ ပြထားပါတယ်။
"olcRootPW" အတွက် terminal မှာ "slappasswd" command ကို အသုံးပြုပြီး ရလာတဲ့ password ကို "olcRootPW" မှာ သတ်မှတ်ထားတာဖြစ်ပါတယ်။
ထိုနောက် "systemctl" command ဖြင့် ldapservices ကို start လုပ်ပါမယ်။
Import Schemas to ldap directory
အစက ပြောခဲ့တဲ့အတိုင်းပဲ အရင်ဆုံး ldap ကို setup မလုပ်ခင်မှာ လိုအပ်တဲ့ schema တွေကို "/etc/openlda/slapd.d/cn=config/cn=schema" directory ထဲကို import အရင်လုပ်ထားပါမယ်။"/etc/openldap/slapd.d/cn=config/cn=schema" ထဲ မှာ import လုပ်လိုက်တဲ့ schema တွေ ရောက်သွားပြီဖြစ်ပါတယ်။
Populating OpenLDAP Database
အခု ကစပြီးတော့ ldap directory structure create လုပ်ပါတော့မယ်။ တစ်နည်းအားဖြင့် Tree Structure ပုံစံမျိုးနဲ့ သတ်မှတ်ပါတယ်။ အရင်ဆုံး base structure ကို create လုပ်မှာ ဖြစ်ပါတယ်။ သဘောတရားကတော့ base structure (base.ldif) file ထဲမှာ သတ်မှတ်မယ့် domain name ရှိမယ် နောက် Users and Groups OU နှစ်ခုကို သတ်မှတ်မှာဖြစ်ပါတယ်။ မှတ်မိလွယ်အောင် AD လိုမျိုး စစဆောက်ပြီး AD Users and Computers ထဲမှာ ဘာ OU မှ ရှိမနေပဲ "Users" and "Groups" containers ပဲရှိသလို မျိုးဖြစ်ပါတယ်။#Create Directory folder called /root/openldap/toplevel ထဲမှာ base.ldif ဖိုင်ကို တည်ဆောက်မှာ ဖြစ်ပါတယ်။ဖြစ်ပါတယ်။
အောက်ပုံမှာ "base.ldif" file ထဲမှာ top level domain ရယ် နောက် ou နှစ်ခု ဖြစ်တဲ့ "Users" and "Groups" နှစ်ခု ကိုတည်ဆောက်ပေးထားပါတယ်။ ထိုအထဲမှာ သုံးထားတဲ့ "objectclass" တွေ "attributes" တွေကို အသုံးပြုနိုင်ဖို့အတွက် လိုအပ်သော schema ကို ကြိုတင် import လုပ်ထားမှာ အသုံးပြုနိုင်မှာဖြစ်ပါတယ်။
ပြီးရင်တော့ #ldapadd command ဖြင့် "base.ldif" file ကို import လုပ်ပါမယ်။ ဒါဆိုရင် domain, users and groups တည်ဆောက်ပြီ: သွားပြီးဖြစ်ပါတယ်။
အောက်ပုံ ၃ ပုံကတော့ openldap schema file တစ်ခု ဖြစ်တဲ့ "core.ldif" file under "/etc/openldap/slapd.d/cn=config/cn=schema" ထဲမှာ အပေါ်မှာအသုံးပြုခဲ့တဲ့ object class တွေ attributes တွေ ဆက်နွယ်ပုံကို ပြထားတာပါ။
Using #ldapsearch
#ldapsearch command ကိုအသုံးပြုပြီး import လုပ်တာ ရောက်သွား သလားဆိုတာ query လုပ်ကြည့်လို့ရပါတယ်။ "cn=sysadmin,dc=example,dc=com" ဆိုသည်မှာ ldap ရဲ့ root user account "sysadmin" ကို ပြောတာဖြစ်ပြီး နောက်က "-w anaconda" က "sysadmin" ရဲ့ password ဖြစ်ပါတယ်။ ကျန်တာကတော့ "man ldapadd" ဖြင့်ခေါ်ပြီး ရှာကြည့်ပေးပါ။
Managing Linux Users and Groups in LDAP
အခု section မှာ base structure ဆောက်လို့ပြီးတဲ့နောက် users တွေ groups တွေကို create လုပ်ကြည့်မှာဖြစ်ပါတယ်။ အခု ဒီမှာတော့ "OU" directory တစ်ခု ဆောက်မယ် ပြီ:ရင် ထိုထဲမှာ "Marketing" နဲ့ "Sales" ဆိုပြီး directory နှစ်ခု ထပ်ဆောက်ပါမယ်။ အခု လုပ်နေတာတွေဟာ မိမိစိတ်ကြိုက် user defined tree structure hierarchical တည်ဆောက်နေတာ ဖြစ်ပါတယ်။
Creating LDAP User Account
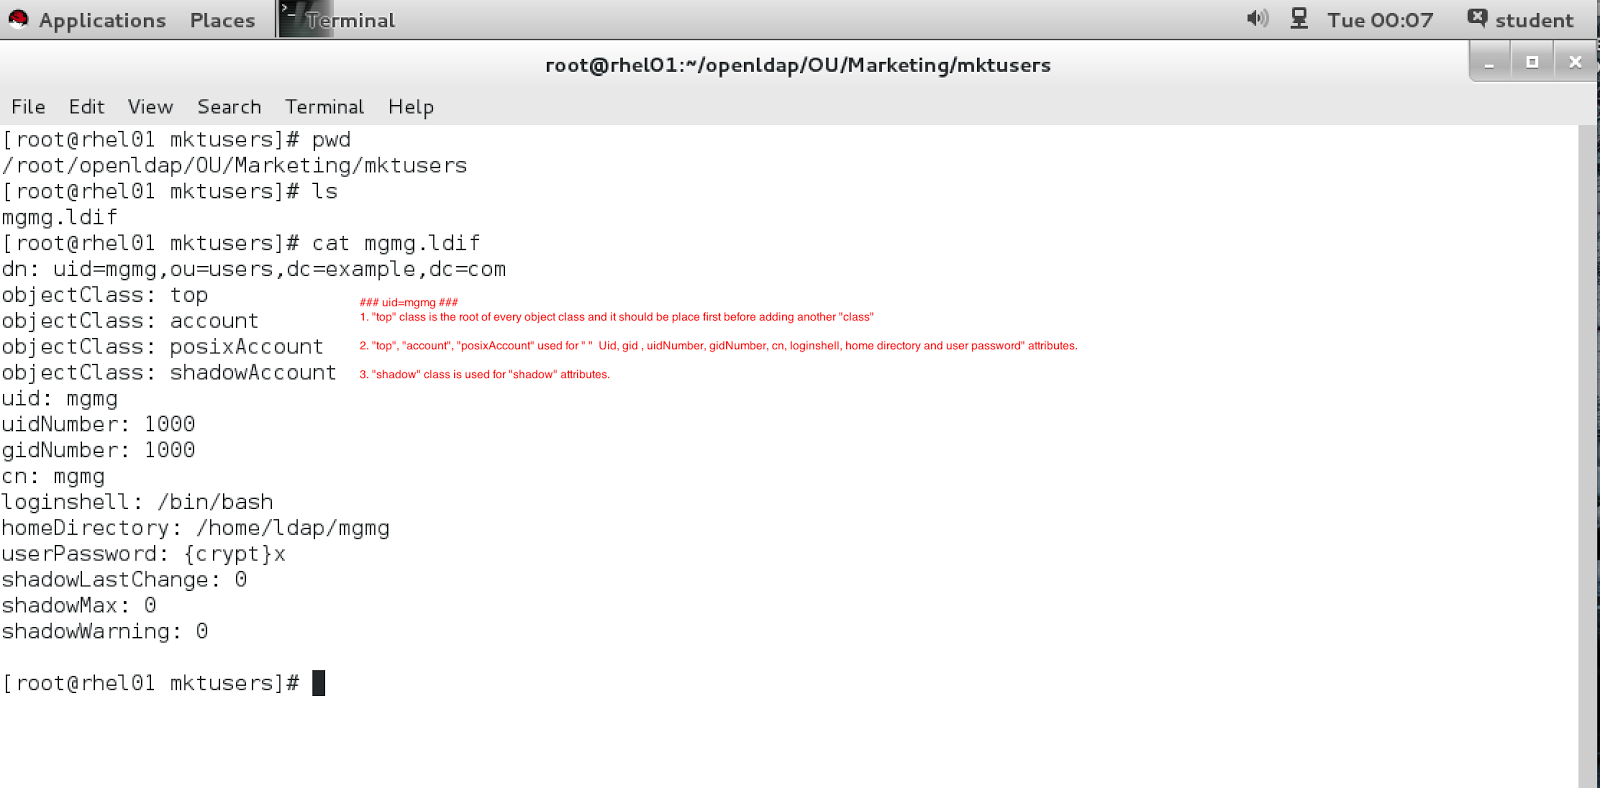
ပုံထဲမှာ marketing user တစ်ယောက် "mgmg.ldif" ကို create လုပ်ပြထားတာ ဖြစ်ပါတယ်။ နောက်ထို ဖိုင်ထဲမှာ ထည့်သွင်းဖို့ လိုအပ်တဲ့ "object class" တွေ "attributes" တွေကို ထည့်ပေးထားပါတယ်။ အောက်ပုံထဲမှာ "userPassword" မှာ {crypt}x လို့ရေးထားတာက default ဖြစ်ပါတယ်။ ပြီ:မှ #ldappasswd command ဖြင့် user "mgmg" ရဲ့ password ကို သတ်မှတ်မှာ ဖြစ်ပါတယ်။
ပြီးရင်တာ့ #ldappasswd ဖြင့် "-s password" ဆိုတာက "mgmg" ရဲ့ password ကို သတ်မှတ်လိုက်တာ ဖြစ်ပါတယ်။
"/etc/openldap/slapd.d/cn=config/cn=schema" ထဲမှ cn={3}nis.ldif schema မှ objectclass နဲ့ attributes တွေကို useradd တဲ့နေရာမှာယူသုံးသွားတာ ဖြစ်ပါတယ်။
Creating Groups into LDAP
အခုထုံးစံအတိုင်းပဲ marketing အတွက် group "mktgroup.ldif" ဖိုင်ကိုတည်ဆောက်မယ် ပြီ:ရင် #ldapadd command နဲ့ပဲ import လုပ်သွားတာဖြစ်ပါတယ်။
Adding Users to LDAP Groups
အခု ဒီမှာတော့ Marketing ထဲမှာ ရှိတဲ့ user "mgmg" ကို marketing group ထဲကို member လုပ်မှာဖြစ်ပါတယ်။ "memberof.ldif" ဖိုင်တစ်ခု ဆောက်ပြီ: ထည့်မှာဖြစ်ပါတယ်။
အောက်ပုံမှာ member of ထည့်တာကို #ldapadd နဲ့ လုပ်သွားသလို #ldapmodify command နဲ့လဲ အသုံးပြုနိုင်ပါတယ်။ အကုန် အတူပဲ ဖြစ်ပြီ: ရှေ့က #ldapmodify ပဲ ကွဲတာ ဖြစ်ပါတယ်။
#ldapsearch command ဖြင့်ကြည့်လျှင် Marketing Group မှာ "mgmg" သည် member ဖြစ်သွားသည်ကို တွေနိုင်ပါတယ်။
Deleting Entries from LDAP Directory
Entry ကို ဖျက်မယ်ဆိုရင်တော့ #ldapdelete command ကို အသုံးပြုပါတယ်။ ဥပမာ "mgmg" ဖျက်မယ်ဆိုရင် #ldapdelete -x -D "cn=sysadmin,dc=example,dc=com" -w anaconda "uid=mgmg,ou=users,dc=example,dc=com" ဆိုပြီ: ဖျက်နိုင်ပါတယ်။
အခုဆိုလျှင် basic configuring openldap ပြီးသွားပြီ ဖြစ်ပါတယ်။ တစ်ဖက်ကနေ Authentication လှမ်းလုပ်တဲ့ပုံစံကိုတော့ သတ်သတ် aritcle တစ်ခုအနေနဲ့ ရေးပေးပါမယ်။ ကျွန်တော်ကိုယ်တိုင်လဲ ldap ကို expert မဟုတ်တဲ့ အတွက် အခု article မှာ လိုတာတွေလဲ ရှိကောင်းရှိပါလိမ့်မယ်။ အနည်းဆုံးတော့ #Undearstanding နဲ့ #Configuring ကိုကြည့်ပြီ:လျှင် openldap basic သဘောတရားလောက်တော့ သိလိမ့်မယ်လို့ မျော်လင့်ပါတယ်။
0 comments:
Post a Comment
Note: Only a member of this blog may post a comment.