အခု tutorial မှာ ပြောမှာက link aggregation အကြောင်းဖြစ်ပါတယ်။ Link aggregation မှာဆိုရင် RHEL မှာ bonding and teaming method ဆိုပြီး နှစ်ခုရှိပါတယ်။ Bonding method သည် အရင် rhel version မှာတွေထဲက အသုံးပြုလာတာဖြစ်ပြီး အခု rhel-7 မှာတော့ new method အနေနဲ့ teaming ပါ၀င်လာတာဖြစ်ပါတယ်။ တစ်နည်းအားဖြင့် bonding method ထက်ပိုပြီး advanced features တွေပါ၀င်ပါတယ်။ ဥပမာ load balancing for lacp support, performance ပိုင်း နဲ့ configuration တွေမှာ teaming method က ပိုပြီးကောင်းမွန်ပါတယ်။
အဲ့တော့ အခု သူ့ရဲ့ အလုပ်လုပ်ပုံကို အကြမ်းဖြင်းပြောရမယ်ဆိုရင် ကျွန်တော်တို့ OS ပေါ်မှာ network interfaces နှစ်ခု သို့မဟုတ် နှစ်ခုထက်ပိုတဲ့ interfaces တွေကို ပေါင်းပြီး logical network interface တစ်ခု create လုပ်တာဖြစ်ပါတယ်။ အဲ့တော့ အဓိက အားဖြင့် ဘာကြောင့် combindလုပ်ကြလဲဆိုရင် fault tolerance ရချင်လို့ ဖြစ်ပါတယ်။ Teaming method မှာ "activebackup", "loadbalance" and "roundrobin" ဆိုပြီး ရှိပါတယ်။
အခု tutorial မှာတော့ "activebackup" method နဲ့ အသုံးပြုမှာဖြစ်ပါတယ်။ "activebackup" အလုပ်လုပ်ပုံကတော့ inetrface တစ်ခုသည် အလုပ်လုပ်နေလျှင် နောက် interface တစ်ခုက waiting အနေထားမှာ standby ရှိနေမှာ ဖြစ်နေမှာဖြစ်ပါတယ်။ Setup လုပ်ရာမှာ manually နဲ့ လုပ်နိုင်သလို Network Manager command #nmcli နဲ့လဲ အသုံးပြုနိုင်ပါတယ်။
Check with #iplink command to show available network physical interfaces
ပုံထဲက အတိုင်း #iplink ရိုက်လိုက်ပါက rhel01 vm ထဲမှာ en03xx and en05xx ဆိုပြီး physical network interfaces နှစ်ခု ကိုတွေ့မှာ ဖြစ်ပါတယ်။ ထို physical network interfaces နှစ်ခုကို teaming လုပ်မှာ ဖြစ်ပါတယ်။

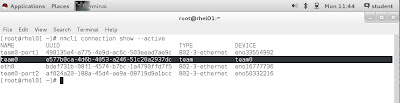
Create team master with using #nmcli command
အောက်ကပုံမှာ Network Manager command #nmcli ကို အသုံးပြုပြီး အရင်ဆုံး team master "team0" interface ကို create လုပ်ခြင်း ဖြစ်ပါတယ်။ '{"runner": {"name": "activebackup"}}' ဆိုသည်မှာ အခု create လုပ်နေတဲ့ team0 interface ကို ဘယ် method နဲ့ လုပ်စေချင်လဲ ဆိုတာ သတ်မှတ်တာ ဖြစ်ပါတယ်။
ထို့နောက် ၎င်း "team0" interface အတွက် ip address သတ်မှတ်ပါတယ်။ manually assign ဖြစ်တဲ့အတွက် ipv4.method မှာ manual လို့ ရေးရပါမယ်။
Create team-slave with using #nmcli command
ထို့နောက် team-slave create လုပ်ပါမယ်။ #ip link command နှင့် ကြည့်ခဲ့တဲ့ available physical nic card 2 နှစ်ခု ကို master "team0" ထဲသို့ teaming လုပ်မှာဖြစ်ပါတယ်။
Review teaming state with #teamdctl
ပုံထဲမှာ #teamdctl team0 state နှင့် ကြည့်လျှင် ကျွန်တော်တို့ create လုပ်ထားသော "team0" network ကိုတွေ့ ရမည် ဖြစ်ပြီး add လုပ်ထားတဲ့ physical NIC Card နှစ်ခု ရယ် နောက် currently active ဖြစ်နေသော network interface တစ်ခုရယ် ကိုတွေ့ရမှာ ဖြစ်ပါတယ်။
Checking with #ip addr show #nmcli and #ping test
Enjoy Reading and Thank You!!!
Please also Like and Follow Root Of Info Page
0 comments:
Post a Comment
Note: Only a member of this blog may post a comment.